Complete LPG Installation Kit for Motorhomes with Fixed Toroidal Tank | Easy Installation

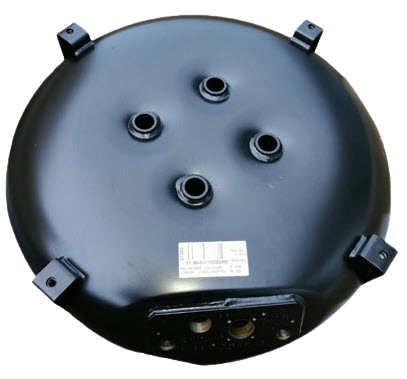
In this article, we present an LPG installation kit for motorhomes, equipped with a fixed LPG tank in the shape of a wheel. This kit is designed for easy installation in an existing motorhome and utilizes the existing pressure regulator in your gas bottle compartment to connect to your appliances.

Order this kit online – fits under almost any motorhome:
https://shop.vanmeenen.com/en/camping_outdoor-12/kit-lpg-bottles-59/lpg-installation-kit-for-campers-with-fixed-ring-tank-4475

Contents of this kit:

✅ LPG toroidal tank with vapor withdrawal (58 liters, diameter 630 mm, height 225 mm)
✅ Pre-mounted valves on the tank, filling hose, and external filler
✅ Mounting bolts, large washers, and clamps
✅ Manual shut-off valve for the gas bottle compartment, including fittings
✅ LED fuel gauge (for reading inside the motorhome)
✅ High-pressure hose (2 meters), fittings, and pre-reducer (pressure regulator)
✅ LPG external filler with French connection and filling adapters

This kit includes all the necessary components to install a fixed LPG tank in place of the spare wheel.

Deze kit bevat alle onderdelen die je nodig hebt om een vaste tank te monteren op de plaats van het reservewiel.

Pre-mounted valves on the tank:

✔ 80% fill stop valve with elbow for connecting the fill hose
✔ Manual withdrawal valve with 1/4″ female thread connection – for direct mounting of the 1.5 bar pre-reducer/pressure regulator
✔ Overpressure relief valve
✔ Tank level gauge

Tank mounting

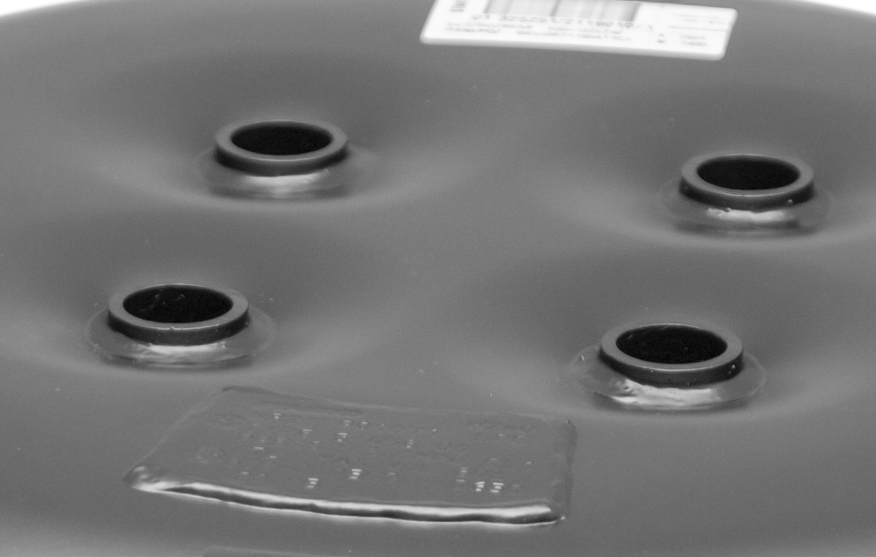
The tank can be mounted underneath the vehicle using the four welded mounting brackets on the tank:
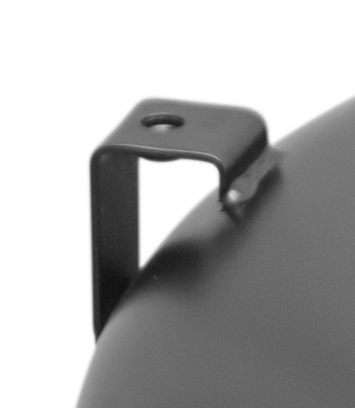
The tank can be mounted underneath the vehicle using the four welded mounting brackets on the tank:

🔹 Bolts and nuts are included to secure the tank to the floor of your motorhome. If the floor is not flat, a spacer can be used, or a support frame can be made using steel profiles.

🔹 If a frame is needed, check whether it can be attached to the existing mounting points of the vehicle using bolts.

🔹 Alternatively, the four holes in the center of the tank can be used for mounting. The necessary rods are not included but can be purchased separately as threaded rods.

🔹 The LPG toroidal tank must be mounted with at least four attachment points.
Connection inside the gas bottle compartment
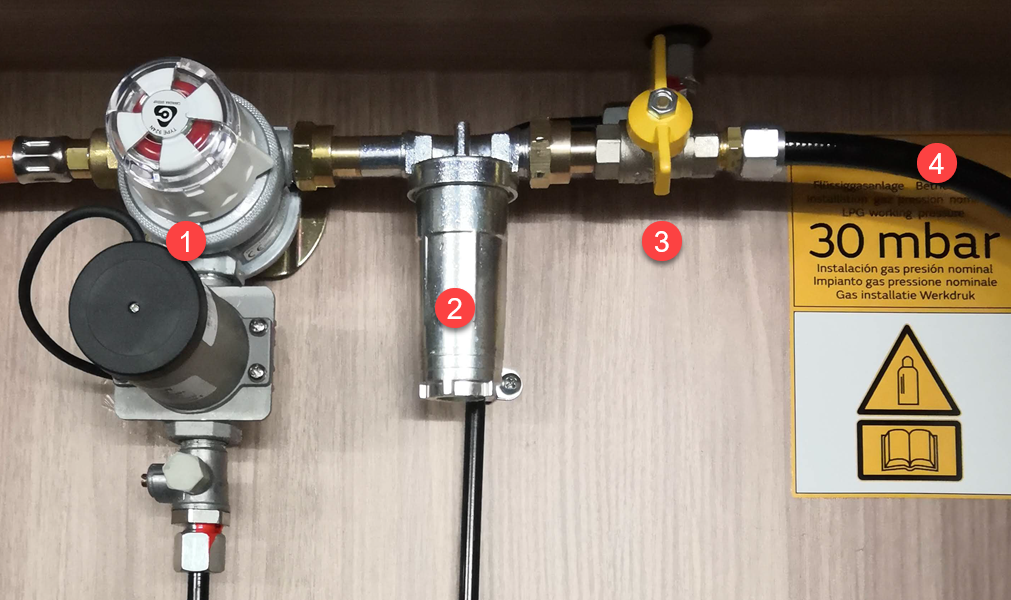
  1. Existing pressure regulator in the motorhome (not included in the kit)
  2. LPG filter fits on the LPG pressure regulator (not included – available separately)
  3. Manual shut-off valve with fittings (included in the kit)
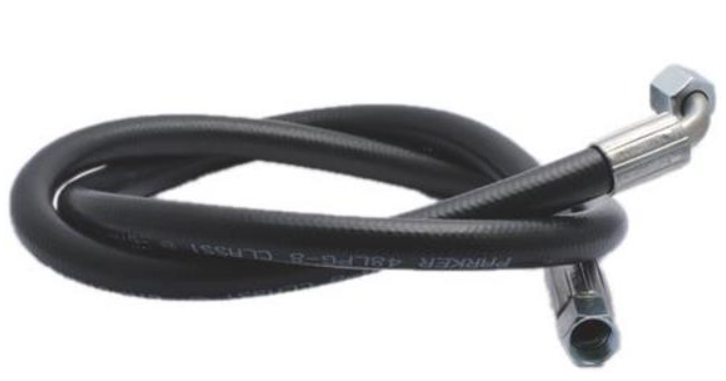
  4. PVC high-pressure hose (67R class 1) with fittings (included in the kit)

External filler installation

We supply an external filler with a direct French connection:
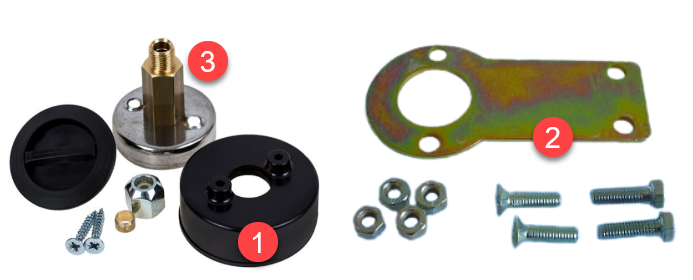
  1. Recessed filler housing (for mounting in the wall or bumper)
  2. Metal mounting bracket (for under-bumper installation)
  3. LPG external filler with French connection

Manual withdrawal valve with pressure regulator
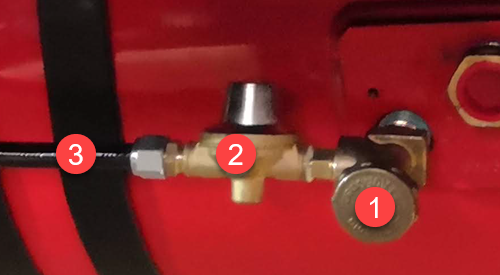
  1. Manual withdrawal valve on the tank (included)
  2. 1.5 bar pre-reducer (reduces pressure for safety), including fittings (included)
  3. 67R class 1 homologated PVC pressure hose, including fittings (included in the kit)

LPG filling adapters included for all of Europe
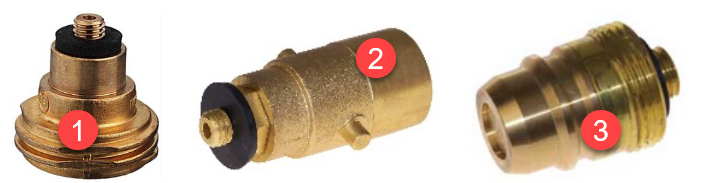
This kit includes all necessary LPG filling adapters for travel across Europe:

  1. ACME adapter – Belgium, Germany, UK, Luxembourg
  2. Bayonet adapter – Netherlands, UK, Norway
  3. Euro adapter – Spain, Portugal

Inbegrepen in de kit zijn alle LPG-vulnippels voor heel Europa.

For the following countries, no adapter is needed as the LPG external filler already has the correct filling connection:
France, Denmark, Greece, Hungary, Italy, Bosnia & Herzegovina, Croatia, Montenegro, Serbia, Slovenia, Norway, Austria, Portugal, Slovakia, Sweden, Czech Republic.

Tank level indication for inside the motorhome
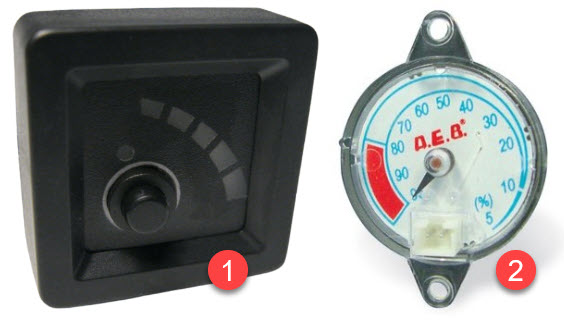
The tank level can be read both directly on the tank and inside the motorhome using the included level indicator.

  1. 5-LED indicator:
    A red LED lights up when the tank is almost empty
    All 5 LEDs light up when the tank is full
  2. Analog gauge directly on the tank
    Electrical cable included

Complete with mounting materials and fittings

This kit is delivered fully equipped with:
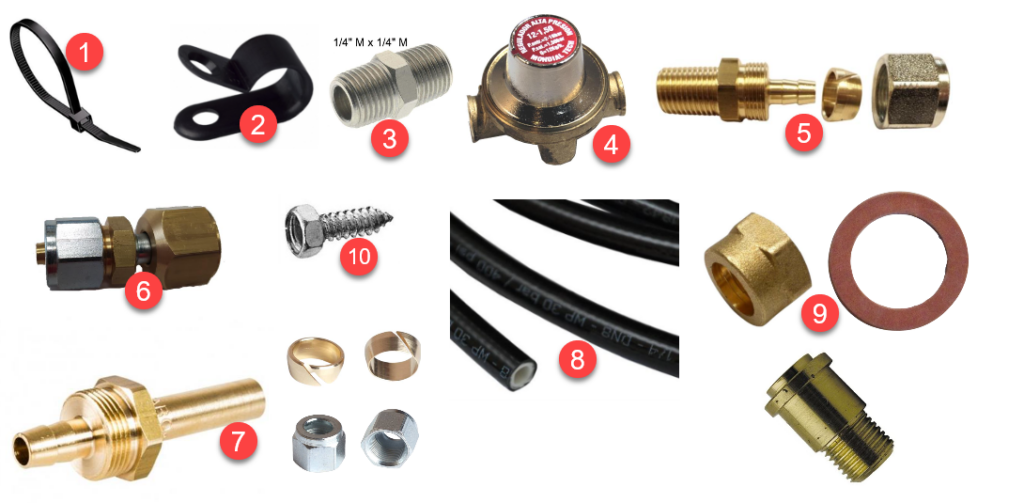
  1. Cable ties for securing the electrical wiring and high-pressure LPG hose
  2. Clamps for mounting the high-pressure PVC hose
  3. 1/4″ x 1/4″ fitting for mounting the pre-reducer (4) directly onto the withdrawal valve
  4. Pre-reducer (to be mounted directly onto the manual withdrawal valve using (3))
  5. 1/4″ male fitting for connecting the PVC hose to the pre-reducer (4) and the manual shut-off valve in the gas compartment (2 pieces included)
  6. Fitting for the LPG tank on the 80% fill valve to the PVC hose (8)
  7. Fitting for the LPG filler connection to the PVC hose (8) with nut and clamp
  8. 8mm PVC hose, cut to length, 67R homologated
  9. 20/150 fitting (nut, nozzle, and seal) – connects the manual shut-off valve to the pressure regulator
  10. Self-drilling screws

Why the use of approved LPG filling hoses is essential

Recently, concerns have arisen about the sale of non-approved LPG filling hoses on the market. In this article, we explain why it is important to pay close attention when purchasing hoses suitable for high-pressure LPG and why using approved hoses is essential for the safety and reliability of LPG installations.

Perforated gas hoses versus hydraulic hoses: The main difference between an LPG gas hose and a conventional hydraulic hose is that a gas hose is ‘perforated.’ This means that small holes have been made in the outer sheath layer of the hose. These holes act as a kind of membrane, allowing gas to escape and evaporate in a controlled manner between the inner and outer layers. In a non-perforated hose, this is not possible, which can lead to blistering in the hose due to the pressure of the gas. This causes gas-filled deformations in the outer sheath. For this reason, ordinary hydraulic hoses should not be used for gas.

European regulation – Regulation 67 (R67): The safety and reliability of LPG installations are regulated by European rules, namely the so-called Regulation 67, or simply R67. This regulation describes in detail the requirements and specifications that must be met. National inspections throughout Europe adhere to these rules. Moreover, these legal requirements for installations are also a prerequisite for insurers to provide coverage for a vehicle.

Categories of gas hoses according to R67: R67 divides gas hoses into two categories based on their maximum working pressure:

  1. Hoses with a maximum working pressure up to 4.5 BAR (class 2). Class 2 hoses are in no case suitable for filling and can only be used in the low-pressure section.
  2. Hoses with a maximum working pressure up to 30 BAR (class 1). This type applies to LPG filling hoses, as well as hoses that form the connection between the fuel tank and the high-pressure side of the pressure regulator).

The specific application of a gas hose in an installation thus depends on the pressure. For comparison: the pressure in an inner tube of a racing bike is usually between 6 and 8 BAR.

Supervision of R67: The government strictly enforces compliance with R67. Homologation according to these standards is an extensive and costly process, and manufacturers are regularly checked through audits to ensure R67 compliance. For cars, this coincides with the periodic (annual) inspection. Although R67 is easy to download, one should be aware that the document consists of approximately 150 pages.

Conclusion: It is of great importance to use only approved LPG filling hoses that comply with European R67 regulations. With us, you can confidently purchase flexible filling hoses that meet the requirements of R67 class 1. We distribute hoses from the renowned brand Parker, a reliable choice for your LPG installation. This way, you know for sure that you are investing in quality and safety, and you are guaranteed a reliable and durable product.

How can you check if the hose is R67 Class 1 approved?

To verify whether an LPG hose complies with R67 regulations, you should check the following markings on the hose:

  • LPG
  • “EХ 67R-01 XXXX”
  • Class 1

If the hose contains these markings, you can be sure that it is an approved R67 class 1 hose.

Valve Protection for Valvecare-Di Additive – New Packaging

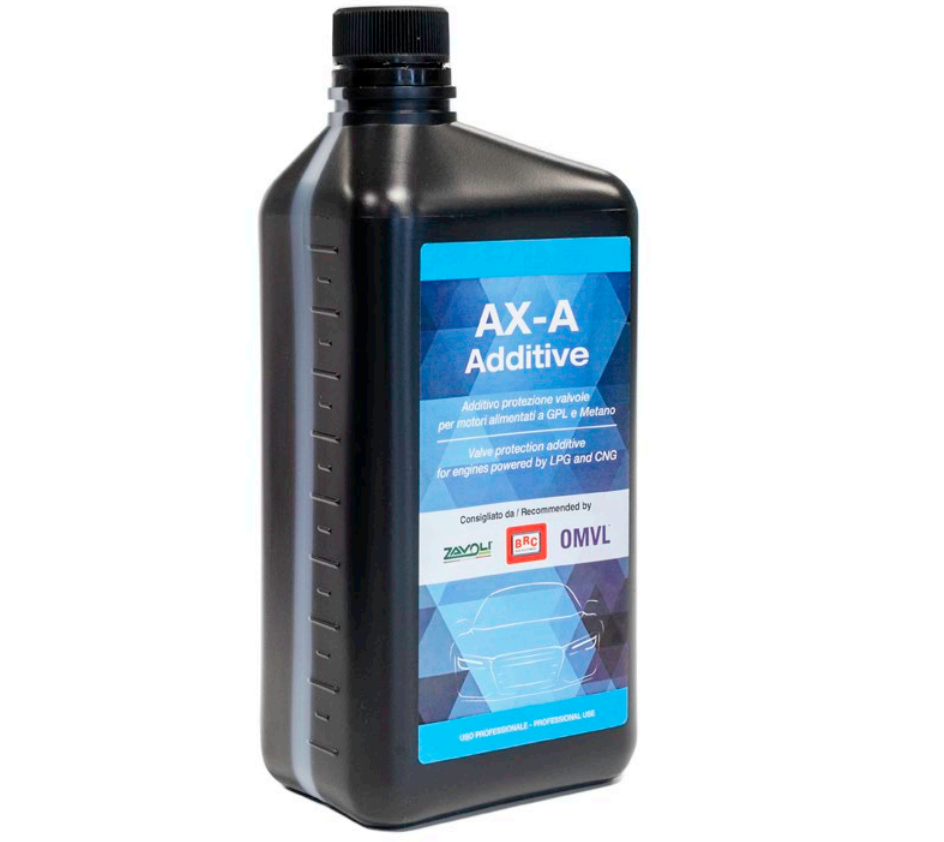
The color of the additive used in Valve Protection and Valvecare-Di systems has been changed from “White” to “Red” to make it more visible inside the pipes and thus facilitate check and diagnostics operations. The well-known composition, with proven protection against valves, seats, and petrol injectors damages, remains unchanged. The “Red” additive is compatible with the “White” one, so that they can also be mixed in whatever quantity. The bottle changes too, for an easier identification of the new product: from metal to black plastic.

This additive is specifically designed for use in Valve Protection and ValveCare-Di systems. It is available in a 1 liter package and is recommended for use with Zavoli, BRC and OMVL systems. Some benefits of this additive include:

  • Reduces wear on valves, seats, and fuel injectors
  • Protects against corrosion and oxidation
  • Improves engine performance
  • Extends the life of the engine
  • Reduces emissions of harmful substances

You can order the additive on our webshop via this link.

Go green and save money with the Zavoli BORADVANCE LPG installation

Do you want to make your gasoline vehicle more environmentally friendly and efficient while saving money? LPG Techniek Van Meenen has the perfect solution for you: the Zavoli BORADVANCE LPG installation.

Our BORA DIRECT systems are suitable for the latest gasoline engines with direct injection and are among the most advanced technologies on the market. With these systems, you can enjoy various benefits, such as improved fuel efficiency and lower emissions of harmful substances.

The Zavoli Boradvance LPG installation works by injecting gas into the engine of your vehicle instead of gasoline. This results in cleaner combustion and reduces the emission of harmful substances. The installation is designed to work with modern gasoline engines with direct injection and is easy to install without major modifications to your vehicle. The gas is injected via the intake manifold and improves fuel efficiency, allowing you to save money on fuel costs. The Zavoli Boradvance LPG installation offers advanced technology that makes your vehicle more efficient and environmentally friendly without sacrificing performance.

With the Zavoli Bora Advance LPG installations, you can not only save money on fuel costs but also contribute to a cleaner and healthier environment. We offer a comprehensive list of available kits for different types of vehicles, so you can always find a suitable solution for your vehicle.

Don’t hesitate any longer and upgrade your gasoline vehicle today with Zavoli Bora Advance LPG installations. Request a quote online here.

Is it still cost-effective to drive on LPG?

LPG is a fuel that is becoming increasingly popular among drivers. It is an alternative to petrol and diesel and is increasingly seen as a cost-effective and environmentally friendly option. Here are some advantages of LPG installations:

  1. Low fuel costs: The main reason why many people switch to LPG is because of the low fuel costs. LPG is generally cheaper than petrol and diesel and can therefore provide significant savings in the long term.
  2. Environmentally friendly: LPG is a clean fuel and emits fewer harmful substances than petrol and diesel. This makes it better for the environment and can contribute to cleaner air and better air quality.
  3. Higher energy efficiency: LPG has higher energy efficiency than petrol and diesel, which means that more kilometers can be covered with the same amount of fuel.
  4. Longer engine lifespan: LPG has a higher octane value than petrol, which provides better combustion in the engine. This can extend the engine’s lifespan and reduce maintenance costs.
  5. Wide availability of filling stations: There are increasingly more filling stations where LPG is available, making the use of LPG more accessible.
  6. Meets strict safety standards: LPG installations meet strict safety standards and are regularly inspected to ensure that they remain safe and reliable.

In short, LPG is still a cost-effective and environmentally friendly fuel option. It can result in lower fuel costs, better air quality, and a longer engine lifespan. With a growing network of LPG filling stations and safe LPG installations, it may be worth considering switching to LPG.

Request an online quote here for an LPG installation in your car.

Price comparison between LPG, petrol, and CNG.

Calculation for a vehicle with a petrol engine that consumes 8 liters per 100 km.

To make a cost comparison for a car that consumes 8 liters of petrol per 100 km, we need to calculate the total fuel costs per 100 km for each of the three fuels: petrol, LPG, and CNG.

For petrol, the price is 1.845 euros per liter. To calculate the cost per 100 km, we multiply the consumption per 100 km (8 liters) by the price per liter (1.845 euros):

8 liters x 1.845 euros/liter = 14.76 euros per 100 km.

For LPG, you consume 15% more than on petrol, so the consumption per 100 km will be 1.15 x 8 liters = 9.2 liters. The price of LPG is 0.7140 euros per liter. So the cost per 100 km for LPG is:

9.2 liters x 0.7140 euros/liter = 6.5808 euros per 100 km.

For CNG, you consume 40% less than on petrol, so the consumption per 100 km is 0.6 x 8 liters = 4.8 kg. The price of CNG is 1.935 euros per kg. So the cost per 100 km for CNG is:

4.8 kg x 1.935 euros/kg = 9.288 euros per 100 km.

So the total fuel costs per 100 km are:

  • Petrol: 14.76 euros
  • CNG: 9.288 euros
  • LPG: 6.5808 euros

Based on this calculation, LPG is the most cost-effective option for this car.

For the prices in the calculation, I took into account the maximum prices of gasoline and LPG on the date of 05/04/2023, for CNG I used the price of DATS24 in Eeklo on 05/04/2023. The calculation does not take into account a portion of gasoline consumption during driving on gas.

Save costs and protect the environment with LPG installations for hybrid vehicles

Hybrid vehicles are becoming increasingly popular due to their low fuel consumption and reduced emissions. But what if you want to save even more on fuel while simultaneously protecting the environment? Then an LPG installation is the perfect solution!

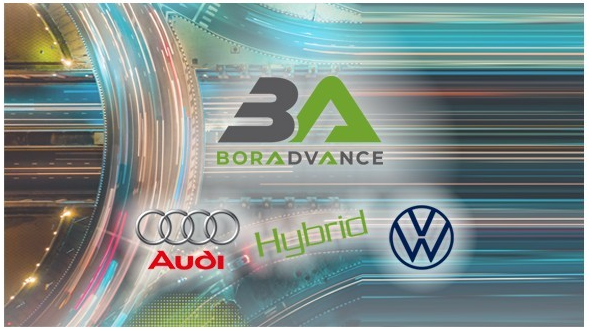
Zavoli is a leading company in the development of LPG installations. With the latest generation Bora Advance system for gasoline direct injection vehicles, it is now also possible to convert hybrid cars to LPG. This means that many new models from Audi and Volkswagen are on the list for conversion.

By converting your hybrid vehicle to LPG, you not only save on fuel costs, but it is also better for the environment. LPG emits fewer harmful substances than gasoline or diesel. Furthermore, LPG is generally cheaper than gasoline or diesel.

Curious if your hybrid vehicle can be converted to LPG? Download the list of vehicles suitable for conversion: https://www.vanmeenen.com/wp-content/uploads/2023/04/Lista-vetture_Rev.-07-del-14-02-2023-1.pdf.

In conclusion, if you’re considering purchasing a hybrid car, it’s definitely worth looking into the possibility of converting it to LPG. Save costs and contribute to a better environment!

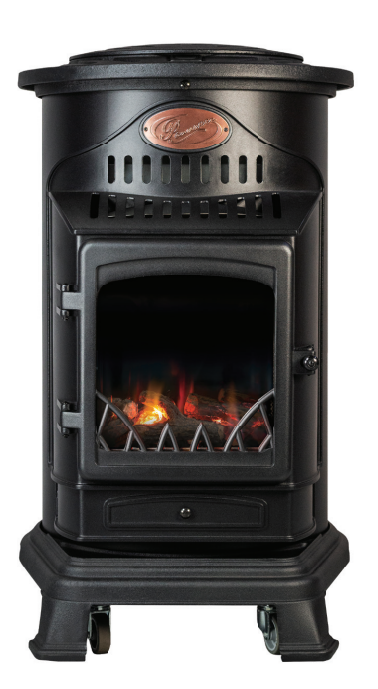
User Manual – Provence Gas Heater with Warranty and Installation Instructions

Flueless Gas Heater – User Manual

Message from the CEO

Dear Customer,
In developing this product, we pursued two goals: delivering the best quality gas heater on the market and producing the most cost-efficient gas heater. We believe we have achieved both goals, but if you have any comments, we would be glad to hear from you. Thank you for purchasing from our range. We wish you many pleasant and warm hours.

Sincerely,

CEO

Warranty
The Provence gas heater is manufactured by Universal Innovations and complies with strict quality standards. The product is covered by the following warranty:

THIS PRODUCT HAS A FULL TWO-YEAR WARRANTY WHEN USED PROPERLY. This warranty does not affect your statutory rights.

For assistance, contact our customer service in Dublin, Ireland at 00 353 1 2873797 or visit www.saharabbqs.com. If you require help, please contact us directly at the factory. Do not return the goods to the place of purchase.

USER INSTRUCTIONS

Important information before using this appliance:

Read the user manual before using this appliance.

When lighting the appliance for the first time, allow it to burn on high for at least 4 hours in a well-ventilated room to cure the synthetic logs (the logs will emit an odor during curing). The flame color will appear yellow at first ignition.

The appliance must be installed and used in accordance with current regulations. Place the heater on a flat surface and use only in a well-ventilated room. Minimum room size: 64 m³ with a minimum ventilation of 80 cm².

Regulator Assembly:
Attach the regulator to the end of the hose and secure with a hose clamp. To ease installation, lubricate the regulator’s ribbed nozzle with soapy water.

Gas Cylinder Installation:

  • Ensure the area is free from unprotected flammable materials or liquids.
  • Replace the gas cylinder according to the instructions. Replacement and connection must be carried out in a flame-free area.
  • Attach the regulator to the new gas cylinder, ensuring the hose is not twisted or damaged.
  • Use a gas cylinder with a maximum capacity of 15 kg.
  • To remove the regulator, ensure it is in the “off” position.

Before ignition:
Inspect the hose assembly. Replace if cut, worn or leaking. Ensure the heating element is placed at least 0.6 m vertically and horizontally from combustible materials. Make sure the heater door is properly closed.

Lighting the heater:

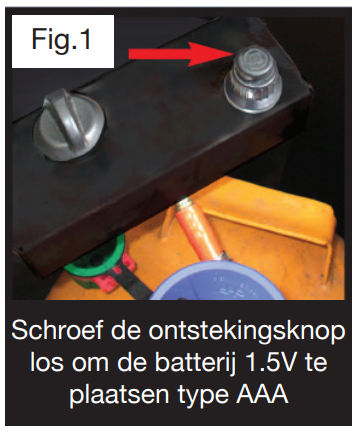
  1. Insert the supplied AAA battery into the ignition button (“+” side up). Remove the battery when not in use.
  2. Turn on gas supply at the regulator.
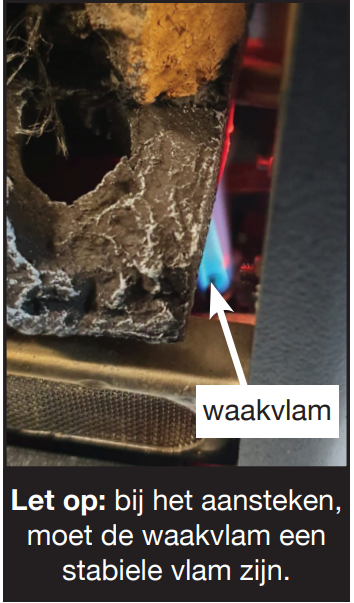
  3. Push down the control knob, turn to the 2nd position, and simultaneously press the ignition button to light the pilot flame while holding the control knob.
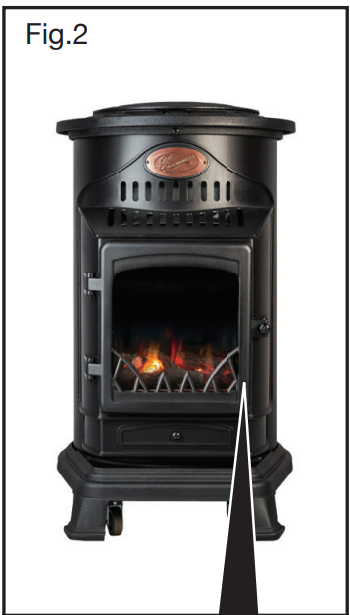
  4. If no spark, check battery placement. The pilot flame is visible on the right side of the log bed.
  5. If the pilot does not ignite, turn to 1st position, wait 1 minute, and repeat step 3. Do not hold the knob continuously.
  6. Once the pilot lights, hold knob at least 10 seconds until main burner ignites. Adjust flame between 3rd (high) and 2nd (low).
  7. If flame does not remain lit, return knob to ignition position and repeat steps.
  8. The 1st position is for pilot flame only.

Turning off the heater:

  1. Turn knob to 1st position.
  2. Turn off at gas regulator after use (pilot remains lit until regulator is closed).
  3. Disconnect regulator from cylinder when not in use.
  4. Remove battery for long storage.

Warning: The glass door prevents fire hazards and burns but does not offer full protection for children or disabled persons. For full protection, use a BS 8423 fireguard.

ASSEMBLY INSTRUCTIONS – IN 3 EASY STEPS

Test all gas connections for leaks using leak detection fluid or soapy water applied with a brush.

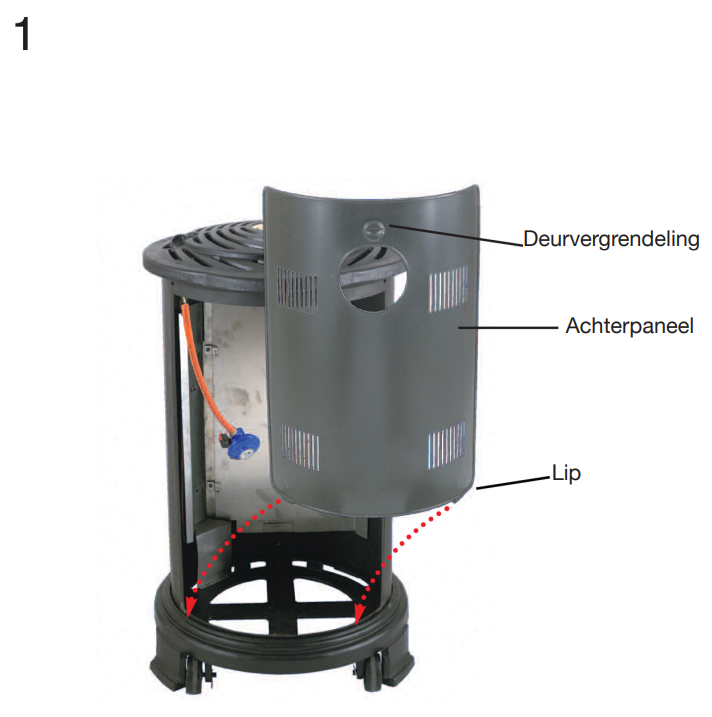
Insert the back panel of the heater by placing the tabs at the bottom of the door inside the frame, then push flush and lock with the door latch.

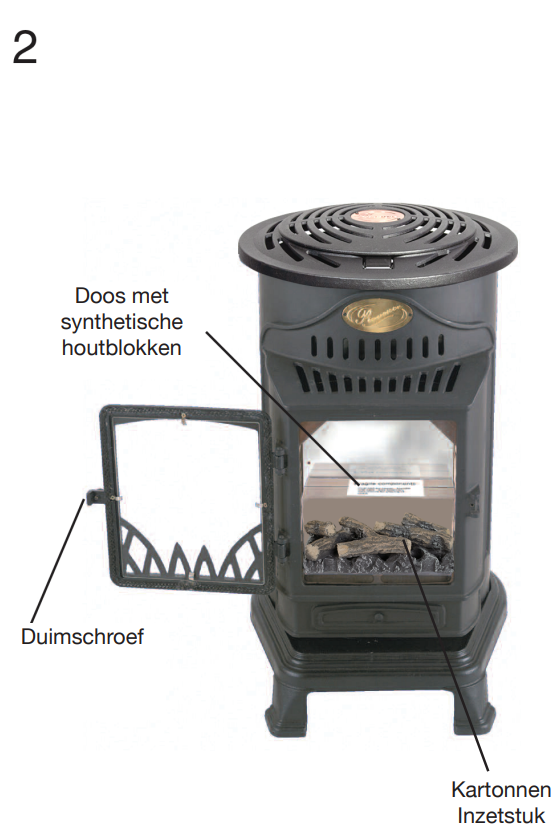
Place synthetic logs on the grate as shown, close the door and lock with the thumbscrew.

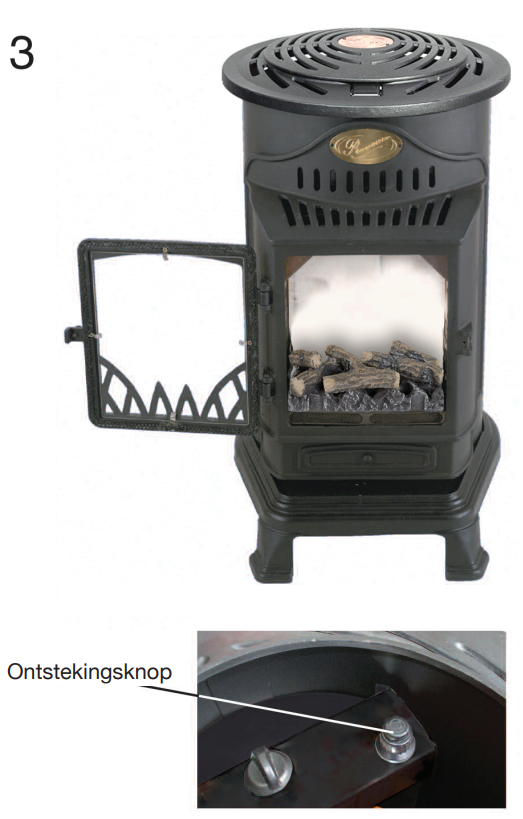
Insert the AAA battery in the ignition button (“+” side up).

An odor upon first use is normal. Burn the stove on the highest setting for 4 hours in a well-ventilated area to harden the synthetic logs.

Technical and Maintenance Information

Indoor use only with Butane, Propane, or LPG at 28–30 mbar supply pressure. Must be serviced by a qualified registered gas technician.

Technical Specifications:

  • Height: 775 mm
  • Width: 460 mm
  • Heat input: 3.4 kW (gross)
  • Gas consumption: 245 g/h (max)
  • Gas category: I3B/P (30)
  • Injector size: 0.9 mm
  • Cylinder size: max. 15 kg
  • Hose: 40 cm (EN 16436-1 compliant)
  • Country of use: Belgium

Warranty: 2 years full warranty under correct use.

Manufacturer contact:
Universal Innovations Ltd., Kilcoole Industrial Estate, Kilcoole, Co. Wicklow, Ireland.
Helpline: 00 353 1 2873797 (Mon–Fri, 9 am–5 pm)
Website: www.saharabbqs.com

Safety Instructions

VEILIGHEIDSINSTRUCTIES
Nooit: gebruik de kachel in hoogbouwflats, kelders, badkamers of slaapkamers.
Nooit: gebruik ander gas dan Butaan, Propaan of LPG.
Nooit: maak de kachel schoon voordat deze is uitgeschakeld en volledig afgekoeld.
Nooit: gebruik een open vlam om vermoedelijke gaslekken op te sporen.
Nooit: laat kinderen of huisdieren in de buurt van de kachel spelen.
Nooit: draai de flexibele gasslang verder.
Nooit: raak het glazen paneel of de voor- en zijkanten van het apparaat aan terwijl het verwarmingselement in werking is. Laat het apparaat een uur afkoelen voordat u de voorkant of zijkanten aanraakt.
Nooit: gebruik in recreatievoertuigen zoals caravans en campers.
Nooit: plaats het apparaat in de buurt van muren, meubels, behang, gordijnen, beddengoed en andere ontvlambare materialen, omdat dit brandgevaar oplevert.
In geval van een gaslek, d.w.z. als u gas ruikt, draait u de kraan van de gasfles dicht. Koppel de gasfles los, neem deze mee naar buiten en neem contact op met een bevoegde servicetechnicus.

Waarschuwing:
Probeer het apparaat nooit aan te steken als de slang los zit of op een of andere manier beschadigd is. Probeer het apparaat ook nooit aan te steken als u redenen hebt om aan te nemen dat het toestel gas lekt. In geval van een gaslek dient u de gastoevoer naar de gasfles af te sluiten en laat het apparaat volledig controleren door een bevoegd persoon volgens de bijgevoegde instructies. We adviseren om aan het begin van elk stookseizoen een onderhoudsbeurt uit te voeren.
Als u de gasfles moet vervangen, controleer dan of de gastoevoer naar de gasfles is afgesloten en dat er geen ontstekingsbronnen in de buurt zijn voordat u verder gaat.

Never: use in high-rise flats, basements, bathrooms, bedrooms, caravans, or campers.
Never: use other gases than Butane/Propane/LPG.
Never: clean while hot.
Never: use open flame for leak detection.
Never: allow children or pets near the heater.
Never: twist the flexible gas hose.
Never: touch glass or panels during operation.
Never: place near walls, curtains, bedding, or flammable materials.

In case of gas leak: shut off valve, disconnect, move cylinder outside, call technician.

Always: place heater on a flat, stable surface, store cylinders outdoors, close gas supply after use, service annually, follow gas bottle safety instructions.

Cleaning: only with damp cloth when cooled.
Gas bottles: designed for Butane/Propane/LPG cylinders up to 11 kg.

Consult invoice history webshop

Did you place an order on our webshop (https://shop.vanmeenen.com/en), and you didn’t receive the invoice by email?

It can happen that your email is rejected by your email server. However, you can still view the invoice online through the webshop. Even if the payment was not successful, you can find the invoice there, so you can manually transfer it.

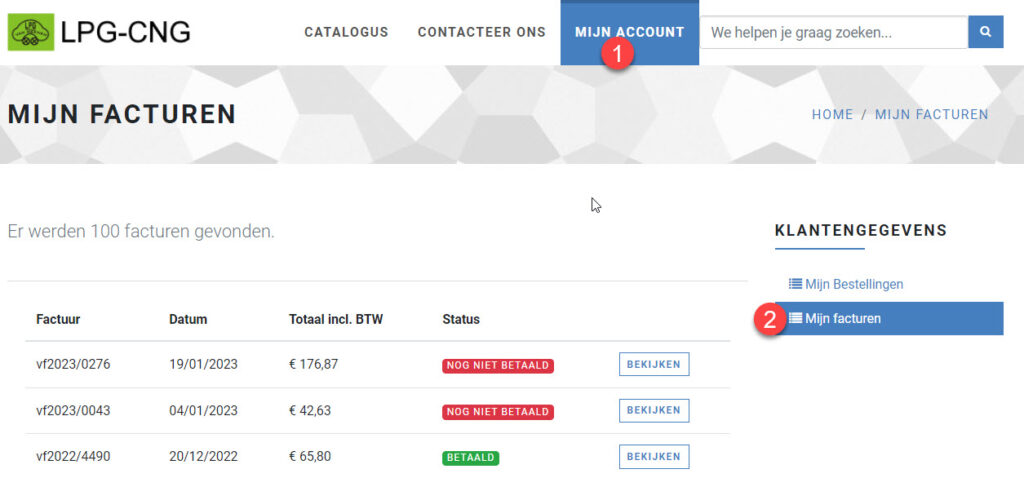
You can do this as follows:

  1. Click on “My Account”
  2. Click on “My Invoices”

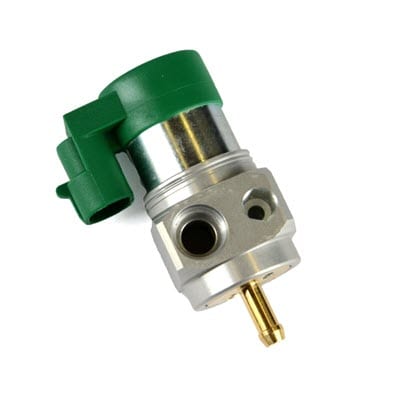
LPG Injector Zavoli PAN JET

There are 3 models of injectors Zavoli PAN JET:

09SQ12000029 Injectors JET MY17 (600PAN. JET| MY18)

Improved version of the original PAN JET injector. Not compatible with Zavoli Alisei. Compatible with Zavoli Bora (configurable in the software). MY17 and MY18 are interchangeable.

Recognizable by:

  • Marking “type JET MY18” or “”type JET MY17” on the injector
  • Dark green coil

09SQ12000021 Injectors JET (600PAN. JET)

Original PAN JET injector. Compatible with Zavoli Alisei and with Zavoli Bora. These injectors can be used to replace the old Zavoli PAN injectors.

Recognizable by:

  • Light green coil

In the Software Zavoli Bora you need to select the right type of injector and the correct calibration nozzles in the software section “parameters” in the drop down menu. You cannot combine 2 different types of injectors in one car.

09SQ12000022 Injectors JET H40 (600PAN. JET H40

Used in certain types of direct injection engines.

LPG installation for direct injection with Prins VSI-DI

LPG installations for direct injection

New kits are available with Prins VSI-DI. With the kit from Prins VSI-DI, a wide range of vehicles can be equipped with an LPG installation (autogas).

Highlights in the new DI list:

  • Universal VSI-3 DI Basic ABC Kits
  • 1.5 TSI (DFYA)
  • 2.0 (CJXB/CJXC/CJXD/CJXF/CJXG/BYK/CPMA/CPMB/DMSA/CYPA/CXDA)
  • New Ford F-150 3.5 & 5.0L MY 2021
  • Hyundai/Kia 1.6 T-GDI (G4FE / G4FT / G4FP)
  • BMW 3.0 (B58 B30)
  • Ford 1.0 (B3GA)
  • Honda 1.0 (P10A2)
  • Renault Megane RS 1.8TCe used Tractor
  • Volvo 2.0 (B420T2) on CNG
  • Suzuki 1.4 (K14D) on CNG